
Life is EASIER in your golden years if you’re strong. Carrying groceries? Children to carry? No problem. Car stuck in the snow? Push it out with ease.
Why Strength Training In Old Age?
In addition to making your life easier, strength training (also known as resistance training) provides a lot of benefits. Here are just a few: It improves bone density, builds a stronger heart, decreases your resting blood pressure, stimulates blood flow, wards off age related muscle loss, helps regulate blood sugar, controls cholesterol levels, plus gets better your balance and coordination.
Most people include cardio workout in their routine, strength training usually remains the neglected kind. Whereas approximately one-half of the Americans follow the recommendations for aerobic exercise, only about 20% perform the recommended muscle-strengthening activities that involve major muscle groups. Women, particularly, avoid doing them.
What If You Have Not Done Strength Training Before?
But if you have not been much into strength training in your younger years or have not performed it for quite some long time, starting it now could be intimidating for you. Don’t feel disheartened! Read on here to find a strength training exercises program plus tips from experts for starting out, building strength and avoiding injury. We have also put together in this guide basic principles to help you take up the strength training in safe and effective way.
Basic Principles Of Strength Training
(i) According to Gavin McHale, a certified exercise physiologist based in Winnipeg, you don’t need to worry about all the workout equipment lining your gym floor. Instead, prioritize on doing workout using your own body weight, learning correct form and gaining a base level of stamina before incorporating extra challenges in to your strength training regime. This way you can cut back the risk of exercise injury and also attain superior results from ensuing workouts.
(ii) McHale advises to begin with basic bodyweight movements (I will train you with some of these later) up to 3 sets of 10-12 repetitions. When that starts feeling easy, it’s hint for you to get into weighted workouts.
(iii) Begin with the smallest amount of weight available in your gym and progress gradually to higher loads as you build up your strength level. If you have access to 2.5 pound weights, great. Aim at performing 3 sets of 8-10 reps, but always focusing on proper form above all else.
Depending upon the exercise you are doing, resistance bands are safe alternatives to traditional weights like dumbbells and rods with plates.
(iv) Strive to perform strength-training exercises 3-4 days a week, on nonconsecutive days. You may consider doing cardio on those alternate days.
(v) If you have never done strength workout before, keep one additional day for rest. Also keep your sessions in the beginning up to 15 minutes. In case you feel sore afterward, wait until the soreness is gone before your next session.
Notes:
(i) A little soreness after workout is normal. In fact it indicates that your body is getting stronger.
(ii) Exercise recovery tends to take longer as you get older.
(iii) Allow your body enough time to get used to and recover from each exercise session in order to attain optimum results.
(iv) If you are new to doing workouts, consider learning the correct forms for doing the various exercises from a coach or trainer.
Strength Training Regime For Seniors
I have selected those resistance exercises that strengthen older adults body’s largest muscle groups through functional movements. These exercises will reward you with improved performance in carrying on your day-to-day activities like getting up from chair, climbing stairs, carrying groceries and lifting your grandkids. As you build up your strength, you will be able increase their difficulty.
You can do these exercises individually: 3 sets of 10-15 reps for each of them.
Or, perform them as a circuit workout session: Perform a set of exercise one, a set of exercise two, and so on. Once you’ve completed all five exercises, that’s one round. Perform 3 rounds total.
Exercise # 1: Squat
 (i) Stand tall in front of a chair with your feet hip-width apart and arms either crossed over your chest or extended straight in front of you.
(ii) Keeping your weight on you heels, slowly push your hips back and bend your knees to lower yourself toward the chair without actually sitting down. As soon as your rear touches the seat (don’t sit down!), straighten your body upright while pushing through your heels and return to the standing position.
(iii) It’s important that throughout the full range of motion, you try to keep your knees over your ankles (in any case don’t allow your knees to go beyond your toes) and place your weight in your heels.
Tip: If you have some problem with your knees that hurts when you squat, you can do the squat starting from a seated position. Push up just a few inches as much as you can. If you feel some tension, lower yourself to sit back.
To Make It Harder, Do This
(i) Increase Number Of Sets And Reps: If you have been performing 3 sets of 10 reps (30 total), increase the numbers to 3 sets of 14 reps or 4 sets of 10 reps.
(ii) Add Weight: Try squatting holding dumbbell(s), a kettlebell or even your young grandchild.
Read here how to strengthen legs.
Exercise # 2 Incline Push Ups
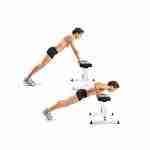 (i) Stand facing a bench, table, edge of a bed or a counter top. Place your hands on its edge, slightly wider than shoulder width apart. Extend your feet back behind you until your body forms a straight line from head to heels. Check that your arms are perpendicular to your body.
(ii) Bend your elbows (they will flare out slightly from your sides) to slowly lower your chest to the edge of the bench. During the movement keep your body straight, and core braced.
(iii) Pause, then return to the start position by pushing your body away from the bench until your elbows are extended, but not locked. Again, keep your body rigid throughout the movement. Continue with slow, controlled and steady repetitions.
To Make It Harder, Do This
When you can perform 15 or more in a row, you may want to decrease the incline height (for example reducing the bench height), until you are performing standard pushups flat on the floor. So if you have been doing pushups using a countertop and start to feel easy, try them using a bench.
Exercise # 3 Row Exercise With Resistance Band
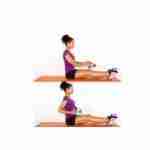 (i) Secure the center of the resistance band by fastening it to a sturdy structure such as a piece of furniture or equipment. Alternatively, you can secure the band by wrapping it around the center of your feet.
(ii) Sit tall on a mat with your legs extended straight in front of you with knees a little bit bent. Slide your shoulders down, away from your ears & pull your abdominal muscles in toward your lower back.
(iii) Using overhand grip hold an end of the band in each hand. Turn your hands to make the palms face each other and outstretched your arms straight to take the starting position.
(iv) Pull the handles toward you as your elbows bend and move slightly behind your torso. Keep your arms close to the sides of your body. Maintain a straight torso and avoid leaning forward or backward.
(v) Stop pulling when your hands reach your body (or as much as you can). Hold the contraction for one count, and then straighten your arms to return to starting position.
Note: It’s important that you keep your spine elongated and abs pulled in during the movement. Avoid hunching or rounding your upper back or shoulders and slightly lift your chest.
Find here 5 strength exercises with resistance bands for seniors
# 4 Stationary (Static) Lunges
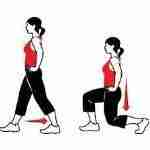 (i) Stand tall with your feet hip-width apart. Place your hands on your hips (you can also place one on the back of a chair for support).
(ii) Take a large step backward with your left leg and lift your left heel up so just your tippy toes are on the floor.
Note: If you can put your back heel down, you need to step farther back.
(iii) Try to put all your weight in your right heel and right quadricep. Your upper body should remain erect (upright), keeping your core engaged with your shoulders back and relaxed. Keep looking straight in front of you
(iv) Keeping your torso vertical, slowly lower your body as close as you comfortably can to the floor – down until your left knee is about 2 to 3 inches away from the floor. Your right knee should form a 90-degree angle as you lower yourself down. If your right knee goes over your toes, take a bigger step back with your left leg. Your toes should not go out past your bent knee.
Note: If you have some issues with your knees, you can lean a little bit forward from the waist to decrease stress on the joints.
Tips For Starting Exercises After 60
(v) Pause, then drive through your right (front) heel to bring your back foot forward and return to the starting position. Repeat on the opposite side. That’s one rep.
To Make It Harder, Do This
Bodyweight lunges are quite taxing for older people, but if you need more challenge, you can enhance the number of reps or hold a small weight in each hand.
# 5 Dead Bug
 (i) Lie flat on your back on the floor with your arms outstretched upright toward the ceiling directly above your shoulders and legs raised at a 90-degree angle to the floor with knees bent so that your shins are parallel to the floor.
(ii) Press the small of your back into the floor and tighten your core.
(iii) While bracing your core and maintaining the bend in your knee, lower one leg and the opposite arm behind you toward the floor.
(iv) Pause, and then return your leg and arm to the starting position. Repeat with the opposite arm and leg. That’s one rep.
To Make It Harder, Do This
If you want more of a challenge, try performing with your legs fully extended, rather than bent.